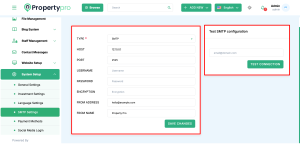
Instructions for Configuring SMTP Settings #
Follow these detailed instructions to configure the SMTP settings for your system. SMTP settings are essential for sending emails from your platform, such as notifications, password resets, and other communications.

SMTP Settings Configuration #
- Set SMTP Type
- Instructions: Select the type of SMTP server you are using. Options typically include default, Gmail, or custom SMTP services.
- Example: Choose Custom SMTP if you are using your own server settings.
- Set SMTP Host
- Instructions: Enter the server address of your SMTP provider. This is usually an IP address or domain name that your emails will be sent from.
- Example: For local testing, type “127.0.0.1”. For a real server, use something like “smtp.example.com”.
- Set SMTP Port
- Instructions: Enter the port number used by your SMTP server for sending emails. Common ports are 25, 465, or 587, depending on your provider’s requirements.
- Example: Type “2525” if your SMTP server uses that port; adjust to “587” for TLS or “465” for SSL encryption if needed.
- Enter SMTP Username
- Instructions: Input the username required to authenticate with your SMTP server. This is often the email address from which emails are sent or a specific SMTP username.
- Example: Type “username@example.com“ or another specific username provided by your SMTP service.
- Enter SMTP Password
- Instructions: Enter the password associated with the SMTP username. This password is used to authenticate the SMTP connection.
- Example: Type your secure SMTP password, ensuring it is correctly entered to avoid connection errors.
- Set Encryption Type
- Instructions: Choose the type of encryption used by your SMTP server to secure email transmission. Options typically include SSL, TLS, or none.
- Example: Select TLS for modern security, SSL for older secure connections, or None if encryption is not required.
- Set From Address
- Instructions: Enter the email address that will appear in the “From” field of outgoing emails. This address represents your system or organization.
- Example: Type “hello@example.com“ to display this address as the sender of system emails.
- Set From Name
- Instructions: Enter the name that will appear alongside the from address in outgoing emails. This name helps users recognize the sender.
- Example: Type “Property Pro” to display this as the sender’s name.
- Save Changes
- Instructions: After configuring all SMTP settings, review the entries for accuracy. Click Save Changes to apply and activate the SMTP configuration.
- Example: Ensure all fields are filled correctly, then click Save Changes.
- Test SMTP Configuration
- Instructions: Test the SMTP setup by entering an email address in the Test Connection field and clicking Test SMTP Configuration. This test will send a test email to confirm that the settings are working correctly.
- Example: Type “email@domain.com“ and click Test Connection. If the test is successful, the SMTP settings are correctly configured; if not, review the settings for errors.
These instructions will help you set up and test SMTP settings to ensure your system can send emails reliably. Proper configuration and testing are essential to maintain communication with your users.

