Property Pro System Configuration Instructions #
Follow these instructions to configure the settings for the Property Pro system.
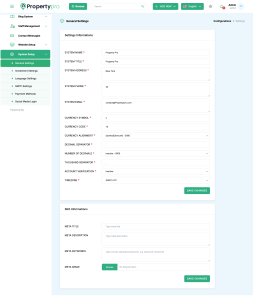
System Settings Configuration #
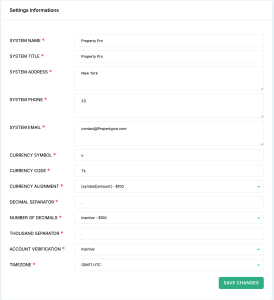
- Set System Name
- Instructions: Enter the name of your system or application in the System Name field.
- Example: Type the desired system name, such as “MyApp” or “CompanyName.”
- Set System Title
- Instructions: Enter the display title of your system in the System Title field.
- Example: Input the system’s official title, like “MyApp Dashboard.”
- Set System Address
- Instructions: Enter the physical address or location of your organization.
- Example: Type “123 Main Street, City, Country.”
- Set System Phone
- Instructions: Enter the contact phone number in the System Phone field.
- Example: Type a contact number like “123-456-7890.”
- Set System Email
- Instructions: Enter the official email address for system-related contact.
- Example: Type “support@example.com.”
- Set Currency Symbol
- Instructions: Enter the symbol of the currency used by your system.
- Example: Type “$”, “€”, or “৳.”
- Set Currency Code
- Instructions: Enter the three-letter currency code relevant to your location.
- Example: Type “USD”, “EUR”, or “BDT.”
- Adjust Currency Alignment
- Instructions: Choose whether the currency symbol appears before or after the number.
- Example: Set to display as “$100” or “100$.”
- Set Decimal Separator
- Instructions: Enter the symbol used to separate decimals in numerical values.
- Example: Use “.” (dot) or “,” (comma).
- Set Number of Decimals
- Instructions: Define the number of decimal places to display for amounts.
- Example: Set to “2” to display amounts like “100.00.”
- Set Thousand Separator
- Instructions: Enter the symbol used to separate thousands in large numbers.
- Example: Use “,” (comma) to format numbers like “1,000.”
- Configure Account Verification
- Instructions: Enable or disable account verification requirements.
- Example: Turn on to require email verification for new users.
- Set Timezone
- Instructions: Select the timezone that aligns with your system’s operational location.
- Example: Choose “America/New_York” or “UTC+0.”
- Save System Changes
- Instructions: Review all settings and click Save Changes to apply the configuration.
- Example: Confirm settings are correct and save them.
SEO Settings Configuration #
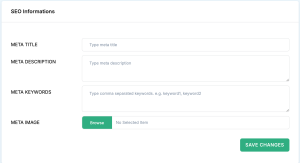
- Set Meta Title
- Instructions: Enter a title that will be used for SEO purposes and shown in search results.
- Example: Type “Your System – Best Solutions for Business.”
- Set Meta Description
- Instructions: Provide a brief summary describing your system for SEO.
- Example: Type “Your System is a powerful platform designed to streamline business operations.”
- Set Meta Keywords
- Instructions: Enter keywords related to your system, separated by commas, for SEO optimization.
- Example: Type “business software, management tools, Your System.”
- Upload Meta Image
- Instructions: Click Browse to upload an image that represents your system.
- Example: Upload a logo or a relevant promotional image.
- Save SEO Changes
- Instructions: Review all SEO fields and click Save Changes to finalize the settings.
- Example: Ensure the meta fields are accurately filled and click save.
These instructions will help you configure the Property Pro system’s settings and SEO information effectively.